Making a bucket hat at home is easy. All you need are fabric, a pattern, and some sewing supplies. Whether you prefer sewing by hand or using a sewing machine, you can create a unique hat with any fabric you love. Follow along in today’s article to learn how to sew a bucket hat at home.
Overview of the bucket hat market
Bucket hats have become a universal fashion staple, fueling a rapidly expanding market. Industry forecasts predict a robust growth trajectory for the global bucket hat market, with revenues projected to surge to $1.45 billion by 2027. This impressive growth is further underscored by a projected compound annual growth rate (CAGR) of 5.7% from 2022 to 2027. The increasing demand for wholesale bucket hats is a testament to this thriving market.
The bucket hat market is primarily categorized by product type and geographic region. Cotton bucket hats reign supreme due to their breathability and comfort, while straw variants offer superior sun protection, making them summer favorites. Wool bucket hats dominate the winter market, providing warmth and style.
North America and Europe currently lead in bucket hat consumption, but the Asia-Pacific region is poised for substantial growth. This expanding market presents opportunities for suppliers of bucket hats bulk to cater to diverse consumer preferences across different climates and regions.
Confirm the size and type of hat you want to sew
There are numerous standard hat size charts available, providing a helpful reference when selecting the perfect fit. To ensure a comfortable fit when wearing bucket hat, consider choosing a hat size that is slightly larger than your measured size.
| Size XS (for baby) | 17” – 18” circumference |
| Size S (for kids) | 19” – 20” circumference |
| Size M (for teenagers) | 21” – 22” circumference |
| Size L (for adult) | 23” – 24” circumference |
| Size XL (Adult extra-large) | 24” – 25” circumference |
Once you’ve determined the ideal hat size, it’s time to focus on the style. Defining the desired shape and characteristics of your hat is crucial, as the vast array of available hat styles can be overwhelming. To simplify the process, we’ll concentrate on a basic plain bucket hat design in this how to hand sew a bucket hat guide. Its versatility and ease of creation make it an excellent choice for beginners.
Related News


Prepare materials before sewing bucket hats
Various hat-making techniques exist, including methods of how to make a bucket hat without sewing. However, this article will focus on the most basic approach: hand sewing using a needle, thread, and fabric. While sewing a bucket hat demands minimal materials, careful selection is crucial for achieving the desired outcome.
Select fabric
Choosing the right fabric is a key step in your how to sew a bucket hat for beginners journey. Cotton, denim, felt, and nylon are popular options. Breathable and soft cotton is a great starting point, as it helps maintain the hat’s shape. However, feel free to experiment with different fabrics based on your desired style and the hat’s intended use.
For a structured, thicker hat, consider denim, jean fabric, or even faux leather to create a defined shape. If you prefer a lightweight and comfortable hat, opt for thinner fabrics. Ultimately, fabric choice should align with your preferred color, pattern, and desired hat feel.
It’s important to choose a fabric that isn’t too thick, as this can make sewing, especially by hand, more difficult. Conversely, excessively thin fabrics may lack structure. In such cases, consider adding a layer of fabric glue to the inside for reinforcement. To be environmentally conscious, repurpose fabric from old clothes like jackets or jeans. This practice reduces waste and saves money.
Other sewing tools
Compared to crocheting a bucket hat, sewing one requires more steps and materials. After preparing the fabric, you’ll need these additional materials for a smoother sewing process:
- Sewing thread: Choose thread with moderate thickness, durability, and resistance to breakage. Opt for a color that matches the hat or provides a contrasting accent. Prepare enough thread to avoid running out during the sewing process.
- Scissors: Select sharp scissors for precise fabric cutting. Fabric scissors are ideal, but regular scissors can suffice for occasional sewing projects.
- Needle: Choose a needle that matches the fabric’s thickness; sizes 7-9 are typically suitable. Opt for a needle with a long handle for easier hand sewing. Have extra needles on hand for replacements.
- Sewing machine (if available): A sewing machine can expedite the hat-making process. Ensure the machine is in good working condition before use.
- Fabric glue: A specialized adhesive used to secure hat components. You may choose to use it based on your project’s needs.
- Pins: For beginners, pins can help secure hat pieces together before sewing.
- Decorative materials: Customize your hat with lace, ribbons, fabric stickers, beads, or other embellishments.
- Other materials: You might also need chalk, a ruler, and an iron for the sewing process.
A small tip to streamline the hat-making process is to gather all necessary materials before beginning. This ensures an uninterrupted workflow and prevents time-consuming searches for missing items.
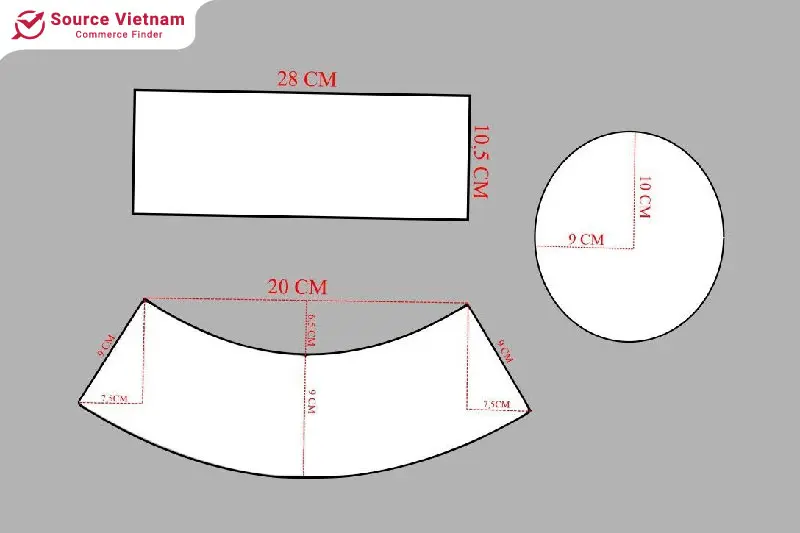
Prepare a pattern before sewing bucket hats
Creating a pattern is a crucial step in the bucket hat making process. It serves as a guide for precise and aesthetically pleasing fabric cutting, ensuring consistent hat shapes. To create a pattern, you will need paper (of sufficient thickness), a pen, a ruler, and a compass.
Method 1: Using a printable pattern
There are various methods for creating bucket hat patterns, but this guide focuses on a simple approach. You can find numerous patterns online, select one that matches your desired size, print it out, and then trace the pieces onto paper. This method eliminates the need for extensive measurements.
Method 2: Creating a custom pattern
If you enjoy a challenge and prefer a personalized touch, you can design your own pattern. Creating a custom pattern allows you to tailor the hat’s dimensions and shape to your exact preferences.
Step 1: Measure head circumference
Place a ruler around your forehead to measure your head circumference. Record this measurement. Draw a circle with a radius equal to half of your head circumference.
Step 2: Draw the hat crown
Draw a vertical line through the center of the circle. Divide this line into four equal parts. Draw a smaller circle with a radius equal to one-fourth of the vertical line. Connect the top of the large circle to the top of the small circle with a curved line.
Step 3: Draw the hat brim
Draw a horizontal line parallel to the vertical axis, approximately 5-7 centimeters from the top of the large circle. Connect the top of the large circle to this line with a curved line. Connect the edge of the small circle to the horizontal line with another curved line.
Step 4: Finalize the pattern
Trim any excess paper and add a seam allowance of 1-2 centimeters around the pattern. Customize the hat’s dimensions (height, brim width) as desired. For durability, use thick paper or specialized pattern-making paper.
How to sew a bucket hat step by step?
With your materials and pattern ready, let’s begin crafting your bucket hat. Don’t worry about how to make a bucket hat with a sewing machine or by hand. This guide provides instructions for both methods.
Step 1: Cutting the fabric
Iron your fabric flat and position the pattern pieces on top. Secure them with pins for easier handling. If using interfacing, cut out corresponding pieces for the crown and brim.
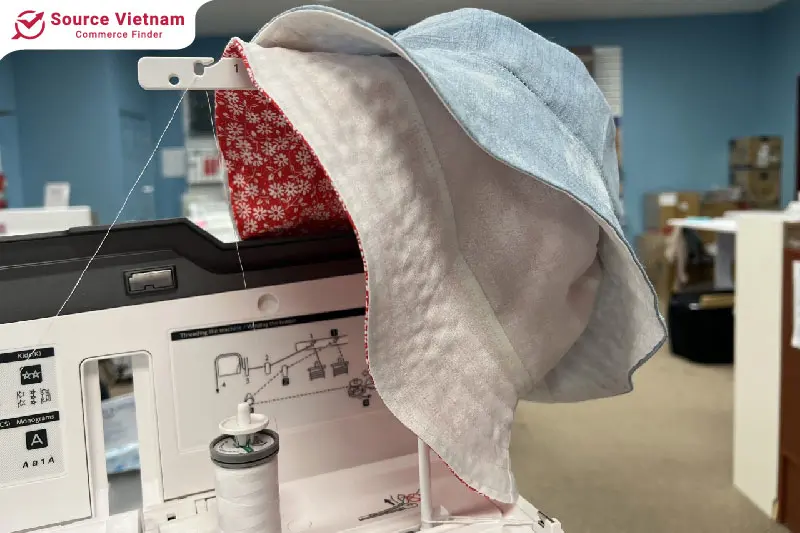
Step 2: Sewing the crown
Place the crown fabric pieces on the right sides together and sew along the side seams. Press the seams flat. Consider adding decorative stitching for embellishment.
Step 3: Attaching the crown to the brim
Position the crown and brim pieces on the right sides together, pinning along the edges. Sew around the entire circumference, leaving a small opening for turning. Trim the seam allowances at the curved sections for easier turning.
Step 4: Turning the hat
Carefully turn the hat right side out through the opening. Shape the crown and brim gently with your hands.
Step 5: Closing the opening
Hand-stitch the opening closed, concealing the stitches.
Step 6: Finishing touches
If using a lining, attach it to the main hat by placing the right sides together, pinning along the edges, and sewing around the circumference. Leave a small opening for turning. Turn the hat right side out and hand-stitch the opening closed. Iron the hat flat to remove wrinkles. Add desired embellishments like ribbons, buttons, or patches.
Tips for Sewing Bucket Hats
To simplify the bucket hat sewing process, consider these helpful tips:
- Beginners: Start with the simplest hat style to gain confidence.
- Fabric selection: Avoid excessively thick or stiff fabrics as they can be challenging to sew.
- Fabric preparation: Ensure fabric is flat, wrinkle-free, and accurately cut for precise measurements.
- Continuous checks: Monitor the hat’s size during the sewing process to make necessary adjustments.
- Seams: Secure seams with locking stitches to prevent unraveling and enhance durability.
- Finishing touches: Trim excess threads and iron the hat for a neat, professional appearance.
Conclusion
With the instructions above, you’re well on how to sew a bucket hat that elevates your style. Craft a unique fashion accessory and personalize your outfit with a touch of DIY flair.
For plain bucket hats or sewing supplies, Sourcevietnam is your ideal platform. We specialize in B2B solutions, streamlining international imports for your business.
Our network connects you directly with suppliers offering a wide variety of high-quality hats, including wholesale mesh hats, at competitive prices. Sourcevietnam simplifies the entire process, handling payments and deliveries seamlessly to ensure you receive your bulk mesh hat orders efficiently. Discover a wide range of bucket hats wholesale in various styles with us.


